Friday, August 23, 2019
Blasting away!
Well I took advantage of some slightly cooler weather and some free time this morning to go ahead and work on sandblasting some more of the cab. I managed to blast the roof, the underside of the floorboard, and started on the interior. I'm thinking the exposed parts will get blasted, the parts that will be covered, such as the underside of the roof, will get a carefully applied treatment with OSPHO, because I cannot see an easy way to do a thorough job of blasting it inside. It will all be covered with headliner and carpet. I just want to kill whatever rust is in there. So with that in mind, I'm getting pretty close to being ready to start knocking out the bodywork on the cab, which will likely be the biggest task still ahead of me, short of reassembly. Lots of dents, lots of sheetmetal to patch in. Lots and lots of filling and blocking.
Tuesday, August 20, 2019
building a fire to get up a head of steam
Well, my injury progress has improved and am able to more or less get around again. Still don't have the stamina or strength that I had before, but I figure if I keep pushing it I'll get better. So I'm starting to really prioritize what I need to work on once I'm able to, and this 100+degree heat subsides. Too hard on the old bones to sandblast in this weather. So other than cleaning up in and around the shop, which seems to be a perpetual activity, I'm getting primed to get back to work and hammer down. Like the title of the post, building a fire to get up a head of steam. fire is small now, but I'll keep pouring the coals to it, and fall will be here before I know it. I am planning to have the cab sheet metal done, body work done, and doors fit and ready to roll along with the front clip fit and ready for paint before I have to evict everything from the shop come Jan 1.
I may even get ansy and paint the cab interior so I can start working on getting that halfway put back together. I feel like that process may take a good bit of time. All the little things that go into getting it back like the dash stuff and gauges, wiring, etc. Soundproofing the cab, fitting the gas tank, rough fit the floormat, etc.
Then just maybe by spring I'll be able to get the exterior paint shot and start on the reassembly process. It did just dawn on me that I probably need to find out where my emergency brake cables are at and get my brake hoses installed so all of that assembly is back together and the frame is as complete as I need it to be. And install the driveshaft...
Friday, June 21, 2019
Broke Down!
No, not the truck. Me! While taking advantage of a rare very slow week, I decided that it was time to turn away from the truck project for a while and work on some home projects that had been building up for a while. Well, a handful of nails away from being done for the evening, I was coming down the extension ladder and anxiously placing the last 6 nails of the evening, clean up, eat supper, and call it good for the day. Then it happened. The air hose for the nailer was laying across the ladder, and instead of the rung, I stepped on the air hose. Down I went. Landed on the concrete with my right ankle just right. Long story short, shattered the end of my tibia. Hoping it was just badly sprained I got my son cleaned up, fed, and to bed. When my wife got home from a softball scrimmage, we went to the ER. After cleaning and stitching some cuts from a flowerpot that helped to break my fall, I got the bad news..your leg is broke and you need surgery. Two days later I had surgery #1 to install an external fixator to stabilize the break and let the swelling go down. 15 days later, I had surgery #2 to install 2 plates and 11 screws to mend everything together. Another 8 weeks of sitting around not being able to bear any weight, no driving, really nothing at all. Lots of thinking, reading, watching TV, and in essence being a big do-nothing lump.
I was released to start partially bearing weight on June 1, back to driving June 10. I still can't walk well, far, or without the help of a cane, but considering 21 days ago, I couldn't even stand to stand on it, gimping around on this cane and mostly being able to walk, with pain, is a pretty good accomplishment. Sometimes I get down because I can't do what I want to, but then I stop and think, It could have been worse. Much worse. And in 3 weeks I am walking. 3 more weeks I may be walking better. Maybe in a couple of months I can ditch the cane. Hopefully before the end of the year I'll be back to like nothing happened.
Take home message....be careful. And be ready for all the curveballs that life will inevitably throw your way. Never well timed and usually with some smoke on em. Be safe...will be back soon!
Tuesday, February 12, 2019
Gas Tank Straps
Work on the truck has slowed because work has been busy and weather has been terrible. I worked on the bed and frame a little last week in the "grauple". Didn't know such a thing existed. I just thought it was sleet. I think they make this stuff up as they go.
But in other news, I was looking at having to buy new gas tank straps because one of mine is cut. Some jughead wouldn't wait to put penetrating oil on the bolt, so they just cut the strap. Replacement straps are over $100, only sold in pairs.
Was hunting in Home Depot yesterday for something else and ran across this little gem. Used to secure trailer houses to the ground. It has a loop on one end just like the original strap, is the same width, and just needs to be cut to length and have the bolt from the original attached, either with rivets or screws. and for a whopping $5!

No it isn't original, and it may not work, but for less than a Lincoln, I'm willing to give it a shot.
Other than that, I've been slowly working on removing the original hardware from the old bed to prepare for re-installation on the new bed. Been slow. I am going to have to take most of it off using a sawzall and a demo bit I think. Bolts are very eroded. I'm not bloodying my knuckles and wasting my time trying to get them undone. Just zip and go.
Seed is slowly moving out of the shop, so I hope to have the cab back inside within the next 30 days. I'll at least have one bay clear and I can put the cab in there. I still have a lot of work to do on it before it is ready for paint. A lot.of.work!
But in other news, I was looking at having to buy new gas tank straps because one of mine is cut. Some jughead wouldn't wait to put penetrating oil on the bolt, so they just cut the strap. Replacement straps are over $100, only sold in pairs.
Was hunting in Home Depot yesterday for something else and ran across this little gem. Used to secure trailer houses to the ground. It has a loop on one end just like the original strap, is the same width, and just needs to be cut to length and have the bolt from the original attached, either with rivets or screws. and for a whopping $5!
No it isn't original, and it may not work, but for less than a Lincoln, I'm willing to give it a shot.
Other than that, I've been slowly working on removing the original hardware from the old bed to prepare for re-installation on the new bed. Been slow. I am going to have to take most of it off using a sawzall and a demo bit I think. Bolts are very eroded. I'm not bloodying my knuckles and wasting my time trying to get them undone. Just zip and go.
Seed is slowly moving out of the shop, so I hope to have the cab back inside within the next 30 days. I'll at least have one bay clear and I can put the cab in there. I still have a lot of work to do on it before it is ready for paint. A lot.of.work!
Wednesday, January 23, 2019
Can't keep a good man down!
Can't keep a good man down, or out, or turned off a project. There may not be any space in the shop, but there is space around back under the shed where the frame is currently parked. So that means I can start rebuilding the wood flatbed originally present on the truck.
The original bed was pine, and I am unsure of it's manufacturer or origin. I have come to the assumption and conclusion that it was a local manufacturer who built beds for dealers, and was a dealer installed option, probably not under the Chevy umbrella. It is just a little too nice and fancy to have been a barnyard build, but it could have been. The winters are cold and long up north.
I picked up a couple of 6x6x10' Pine ACP to replace the foundation of the stringers on the bed. Then a few 4x4x8' cross stringers. Cut the stringers to size, made some relief drills for the frame rivets, then squared up and bolted up. Cross stringers were reliefed for the lag bolt head and secured.
Added a few 2x4's and 2x6's to fill the gaps. Next step is to drill the frame for bolts and attachment. Once all this is done, a good coat of exterior paint followed by a topcoat of paint. Eventually I will install top boards made of tounge and groove pine.
In other news, I should have a clear bay (or at least mostly) to resume some work on the cab.
Tuesday, January 15, 2019
Wanting to go, unable to do much
Well, as mentioned in the last post, we are at an all stop....Seed is in the shop, taking up all usable indoor work space. My cab is currently sitting outside getting jockeyed between here and there, trying to stay out of the weather. I need to pick up some more blasting sand and epoxy primer, but I don't want to do much until I have space to really hammer down, so for the moment, it sits.
I've been making plans, sourcing material, and preparing to start rebuilding the wood flatbed. My local lumberyard has everything that I will need, just have to give them time to get it in. At a quandary as to whether to build the bed on the frame before, or after the cab is ready to install. I'm thinking it may be easier, and more time effective to go ahead and build it and drop the cab on after its complete. Trying to decide on finishes. I'm certain that my aftermarket (or possibly originally home built) bed didn't match the original color. So I'm trying to determine what color scheme to go with. Obviously, it was originally black. but what sheen??? I'm tossing around the wood and metal straps all in semi-gloss, all in gloss, or gloss for the metal components, semi-gloss for the wood. Going to have to mock some stuff up, determine what will look best initially, and what will wear the best.
I still have a few brake components to finish installing. A few brake lines, emergency brake cables, a brake shoe that has to get re-lined, little nit-picky items.
Once I am closer to getting space freed up I have a ton of work to do. I need to finish sandblasting the interior of the cab, the underside, the roof. Epoxy prime and undercoat the underside of the cab. I still have some body work to tackle such as welding in cab corners, a cowl panel, and a portion of the drip edge. Once these parts are installed, and the big dents are knocked out, it will be time to start laying on the filler. Trying to make it as smooth as silk.
I still need to sandblast the doors and get them ready to prime/paint. I will be replacing all the glass. I know they didn't come from the factory with tint, but in Texas, I need the tint. Not going for a concourse restoration, but as close as I can. But I think I'm gonna need some level of tint to make it bearable to drive 6 months out of the year. Especially with no A/C. And vinyl seats.
So basically, I'm making list after list of to-do's while I wait for opportunity to get going when the time is right. Obtaining parts and being ready to roll when I can. I'm also re-evaluating whether or not I am going to stick with the black fenders or go all maroon on the exterior color. Still leaning toward black fenders, but thinking one color may keep it cleaner. Stay tuned!
Sunday, December 23, 2018
Lots of progress, now all stop!
The last couple weeks have been busy with lots of different activities with the goal of making progress on the project. I have set a goal to finish the truck. My plan is to have it on the road by its 70th birthday, which is 1 year from now. So with that goal in mind, here are the things I have done....
Replaced all the original (and likely corroded) brake lines with newly formed 1/4" nickel-copper brake lines. I will also install new fuel lines for the motor. Also replaced all the grease fittings in the frame with brand new fittings so there should be no issues with not being able to push grease into the necessary places.
Additionally, new U-joints were sourced, I just need to take the driveshafts to a press and replace the old joints with new ones. I don't think the old ones were failed, but I figured, I'm here, lets do it.
The one big ticket item that I had to accomplish before the end of the year, mostly because I needed the space was to install the engine in the frame. Progress, but also because I needed the space in the shop that the engine was taking up. So I took the engine, installed the bellhousing, flywheel, clutch, and transmission and had a fully assembled engine/transmission assembly sitting on the cart. But....it was still taking up lots of valuable real estate in the shop with seed coming soon. So with some preparation, such as refinishing the front engine mount (thanks to a generous fellow stovebolter), the engine was prepared to drop back into the frame. New hardware to mount everything was acquired.
The forklift made easy work of picking the engine up off the cart and into the air. I rolled the frame under the lifted engine and lowered it down. Then it was dropped directly onto the frame. Thanks to some line up bars and a little finesse, The engine was sitting in the crossmembers and the new mounting bolts were installed. Following that, the distributor, coil, and starter were installed, engine oil added to keep the internals lubed and protected, and finally covered with plastic and wrapped to keep the engine clean and protected while it sits around until the the sheet metal is ready to be installed.
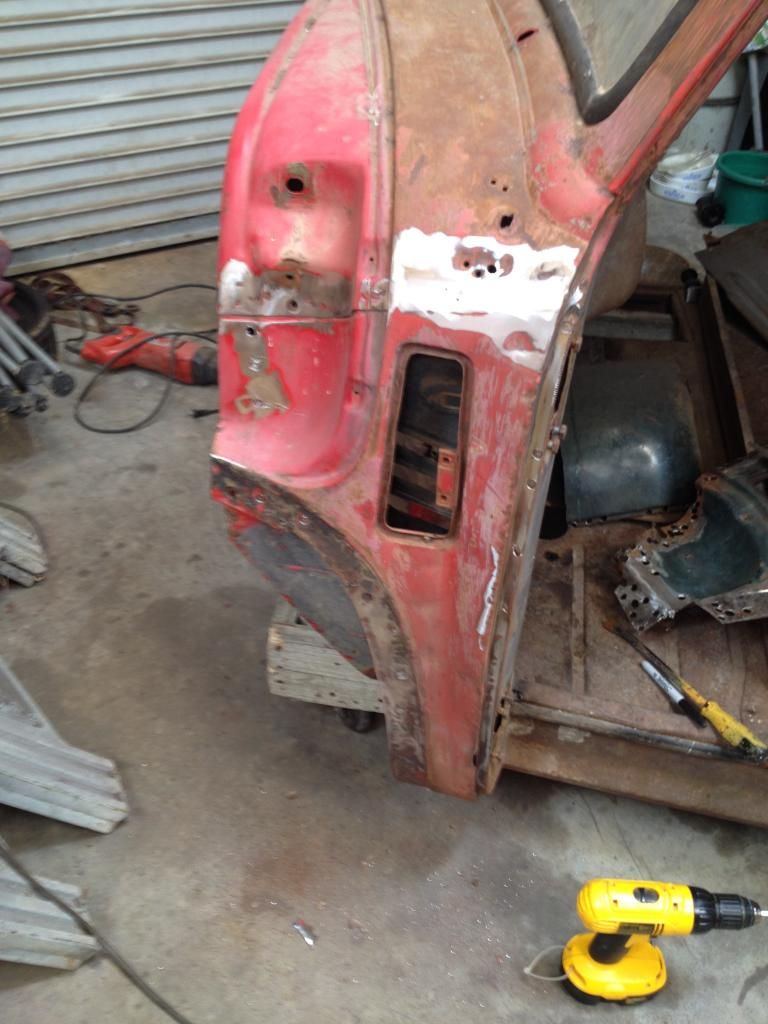
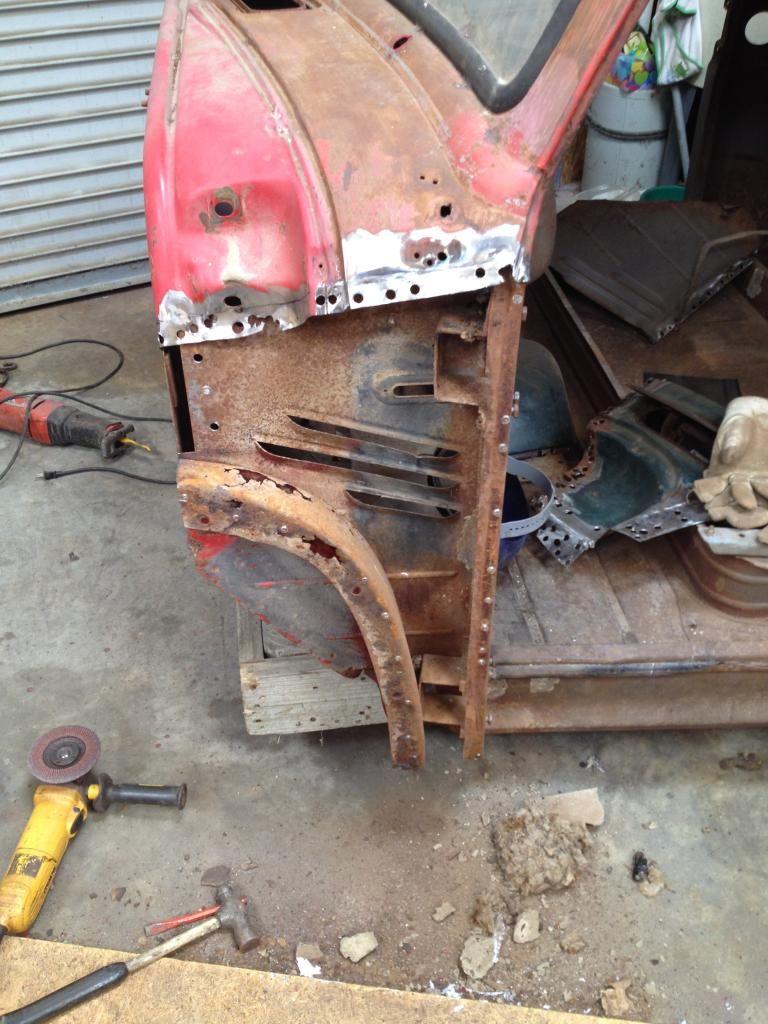
Speaking of sheetmetal, I also worked on the cab. The cab has been sanded bare and in the shop waiting for more bodywork to be completed. It too was going to get evicted so I needed to get it protected. I don't want to have to cover the same tracks again. So in preparing, I needed to get it in epoxy. However, there were areas that were still covered in original paint. So I pulled out the sandblaster and blasted the areas that are being replaced with sheetmetal (drivers cowl, cab corners) and also the firewall, the beltline pinch, any areas that needed extra attention to get clean, the door jambs, dashboard, drip rails, and around the window channels.
After they were all blasted clean, it was time to cover with epoxy. All metal areas bared thanks to sander or blaster were coated with a single coat of epoxy primer. I only gave it one coat because I still had the remainder of the interior of the cab to blast, the roof, and under the floor to do. But all bare metal has a coating of protection and will remain so until I can move it back into the shop and complete the sandblasting, bodywork, and homestretch to paint.
So as I type this, the frame is outside under a tarp, and will be moved around back under cover tomorrow, along with the cab. I will also work on several other sheetmetal items in preparation for paint. I ran out of sand to blast anymore while working on the cab, so the underside of one hood half is needing to be blasted. I also will have to blast the inner and outer fenders, the grill, front splash pan, and the doors.
It may not be completely road-worthy or entirely complete, because my hip pocket is financing this project, but I sure hope to have it back to at least to mostly complete and ready to roll by its birthday. Need some sponsors to give me parts and make it go quicker, but then I'd have to put stickers all over it and that just wouldn't look right. I figure I'm 16 months and $6,000 away from being complete.
I'm kinda at a crossroads though. I received my first load of seed Friday and my shop is no longer usable for the project. So I'll be displaced until at least March 1. I imagine as the weather and time allows, I will work on stuff that I can blast, bump, and prepare outside until I can pull it all back inside. Frame will stay outside until I'm ready to drop the cab on.
If I get way ahead of schedule, but before I can get everything back inside, I have a few ideas to keep moving toward my goal. I will have to build a few items to make the process a little easier. A door holder to hang to doors on for paint. Maybe work on my paint booth that will become a greenhouse after the painting is done. Maybe even begin building on the frame for the bed.
Once I get the shop back, I plan to hammer down on the bodywork and getting it ready to squirt paint. Most of the small parts are complete and ready to install.
I'll post some pictures once I get them moved from my phone.
Replaced all the original (and likely corroded) brake lines with newly formed 1/4" nickel-copper brake lines. I will also install new fuel lines for the motor. Also replaced all the grease fittings in the frame with brand new fittings so there should be no issues with not being able to push grease into the necessary places.
Additionally, new U-joints were sourced, I just need to take the driveshafts to a press and replace the old joints with new ones. I don't think the old ones were failed, but I figured, I'm here, lets do it.
The one big ticket item that I had to accomplish before the end of the year, mostly because I needed the space was to install the engine in the frame. Progress, but also because I needed the space in the shop that the engine was taking up. So I took the engine, installed the bellhousing, flywheel, clutch, and transmission and had a fully assembled engine/transmission assembly sitting on the cart. But....it was still taking up lots of valuable real estate in the shop with seed coming soon. So with some preparation, such as refinishing the front engine mount (thanks to a generous fellow stovebolter), the engine was prepared to drop back into the frame. New hardware to mount everything was acquired.
The forklift made easy work of picking the engine up off the cart and into the air. I rolled the frame under the lifted engine and lowered it down. Then it was dropped directly onto the frame. Thanks to some line up bars and a little finesse, The engine was sitting in the crossmembers and the new mounting bolts were installed. Following that, the distributor, coil, and starter were installed, engine oil added to keep the internals lubed and protected, and finally covered with plastic and wrapped to keep the engine clean and protected while it sits around until the the sheet metal is ready to be installed.
Speaking of sheetmetal, I also worked on the cab. The cab has been sanded bare and in the shop waiting for more bodywork to be completed. It too was going to get evicted so I needed to get it protected. I don't want to have to cover the same tracks again. So in preparing, I needed to get it in epoxy. However, there were areas that were still covered in original paint. So I pulled out the sandblaster and blasted the areas that are being replaced with sheetmetal (drivers cowl, cab corners) and also the firewall, the beltline pinch, any areas that needed extra attention to get clean, the door jambs, dashboard, drip rails, and around the window channels.
After they were all blasted clean, it was time to cover with epoxy. All metal areas bared thanks to sander or blaster were coated with a single coat of epoxy primer. I only gave it one coat because I still had the remainder of the interior of the cab to blast, the roof, and under the floor to do. But all bare metal has a coating of protection and will remain so until I can move it back into the shop and complete the sandblasting, bodywork, and homestretch to paint.
So as I type this, the frame is outside under a tarp, and will be moved around back under cover tomorrow, along with the cab. I will also work on several other sheetmetal items in preparation for paint. I ran out of sand to blast anymore while working on the cab, so the underside of one hood half is needing to be blasted. I also will have to blast the inner and outer fenders, the grill, front splash pan, and the doors.
It may not be completely road-worthy or entirely complete, because my hip pocket is financing this project, but I sure hope to have it back to at least to mostly complete and ready to roll by its birthday. Need some sponsors to give me parts and make it go quicker, but then I'd have to put stickers all over it and that just wouldn't look right. I figure I'm 16 months and $6,000 away from being complete.
I'm kinda at a crossroads though. I received my first load of seed Friday and my shop is no longer usable for the project. So I'll be displaced until at least March 1. I imagine as the weather and time allows, I will work on stuff that I can blast, bump, and prepare outside until I can pull it all back inside. Frame will stay outside until I'm ready to drop the cab on.
If I get way ahead of schedule, but before I can get everything back inside, I have a few ideas to keep moving toward my goal. I will have to build a few items to make the process a little easier. A door holder to hang to doors on for paint. Maybe work on my paint booth that will become a greenhouse after the painting is done. Maybe even begin building on the frame for the bed.
Once I get the shop back, I plan to hammer down on the bodywork and getting it ready to squirt paint. Most of the small parts are complete and ready to install.
I'll post some pictures once I get them moved from my phone.
Progress...
Well, since last post, my new gauges arrived and I put my thinking cap on and got it completely figured out, at least until I get to the point of wiring them up and making them function. I will do a complete different post on the build at a later point, but for now, the gauge upgrade is complete, just waiting to finish off the gauge bezel, new glass, gasket, and chrome ring.
Also, I managed to get the frame sandblasted, shot with 2 coats of SPI epoxy primer and 2 coats of Nason chassis black paint. So it is sitting and looking oh so pretty waiting for me to drop the drivetrain in it. I also managed to find time and weather to sandblast all the underhood sheet metal.
Also, I managed to get the frame sandblasted, shot with 2 coats of SPI epoxy primer and 2 coats of Nason chassis black paint. So it is sitting and looking oh so pretty waiting for me to drop the drivetrain in it. I also managed to find time and weather to sandblast all the underhood sheet metal.
Tuesday, November 13, 2018
Busy, not busy
Well, since my last post, the weather hasn't exactly been cooperating. Been rainy, humid, or just generally not blasting/painting weather. Add to that being busy with work (gotta pay those bills) and not much has visibly happened since last post. However, there has been some projects being worked on. In preparation to finish up the running gear by installing the engine/transmission onto the frame, some things were discovered.
It was discovered that I was missing two very important pieces of the front engine mount...a plate and retainer. So I have been on a search for the missing mount pieces in lieu of having to fabricate the plate and retainer. Also, I have re-created the brake lines from the originals. 1/4" copper nickel tubing was used. Waiting on Amazon to bring my double flare tool so I can finish up my brake lines. Need to source some 5/16" tubing to rebuild the fuel line.
Parallel to the frame restoration and brake/fuel line replacement, I am in the process of restoring the cluster gauge with modern gauges. Thanks to Dave at www.1952chevytruck.com for the bright idea. Again, waiting on Amazon to show up with my gauges.
I guess it gives me something to do while its too wet to do anything outside. The more little stuff I can get done, the faster the big stuff will come together once it is time. I have learned that. Seemingly nothing happens but then one day all of a sudden, all this really cool stuff appears. Most of that is due to a lot of small stuff behind the scenes.
My plan is to do a step-by-step on installing the new gauges. Or maybe to do some custom gauge rebuilds to help finance this project. Gotta see how the first one goes first.
Saturday, November 3, 2018
Frame blasted and primered
Sometimes, it's all about timing. I waited for over 2 months for the perfect timing. No pressing work apppointments, the right weather, time to complete both the sandblasting and priming in one day when the weather was right. High humidity is a killer for sandblasting they say. Our humidity is rarely below 60% until we start getting cold fronts in the winter. Unless the front comes with rain. At any rate...today was the perfect scenario...Low humidity, some free time from work, free stretch of time from 11 till 6. sunshine, moderate winds, low humidity. So I filled up the sandblaster, and decided to pull the trigger.
Blasted the frame. Took longer than expected but I think I have the operation and settings down on this new sandblaster. Bought it from a friend. I borrowed it and enjoyed having it so much I asked if he would sell it. Said, make me an offer, so I shot him a number, and after some (not much) haggling I now own a great sandblaster.
I was surprised that it didn't take as much sand as I anticipated. Quite honestly, a lot less. I bought 15 bags of blast sand. After the entire frame, and several other smaller projects, I still have 8 bags left. Cleaned off the sand and hit it with the epoxy primer. It took exactly 2 quarts to cover the frame and axles with two full wet coats across it. Tomorrow I plan to give the crossmembers a test shot of some chassis paint that I bought a while back. When I cracked the lid today it seemed really really thin. So I'm not sure how it will run. I just know I have 72 hours to topcoat the epoxy before I have to scuff it.
All in all, Very productive and outcome was pretty top end. Next, put the engine in the frame and make a true roller. Till next time...


Monday, April 23, 2018
Just strippin!
Well, seed is delivered. Still have some stock on hand, but it't tarped and has plywood over and around so it doesn't catch any sparks. Managed to get the entire cab nearly stripped. Just have the top of the roof and the firewall, and of course, all those areas in the creavices. Started doing a little dent removal from the back and corners. Prepping to weld in my patch panel areas. Contemplating cutting out another area that is very badly dented. I'm still not sure on that one. Gonna try the studs and pullers.
Having a hard time with my welder. I welded up some holes where the PO had mounted more than 1 mirror over time. Just kept making boogers. No good welds. Gas was on and flowing. Metal was clean. Not sure what is going on there. Going to take the nozzle shield and nozzle out and make sure everything is nice and clean/replaced. This is not the place to make bad welds. Bad welds require extra grinding, grinding generates heat, heat warps panels, makes waves, makes more work.
I did pick up a shrinking disc that I am going to try on my extra cab. Supposed to run on an angle grinder and generate heat without taking metal out or the potential to burn a hole and then quickly cool and tighten the metal back. We shall see.....
Still haven't sandblasted the frame. Kinda just waiting to get a good dry day because blast in the am, paint in the pm. After blasting, it can't wait, gotta paint right away. And I still have seed in the shop and now a cab and front fenders in the other bay. It would all fit, but I also want to work on cleaning some more in the shop. Organize it some.
Well, time to head out. Have to get to softball practice.
Making progress
Well, since the last post, there have been some significant strides made in the bodywork area. I have knocked all but the dents in the roof back to a manageable level thanks to the addition of a slide hammer to my tool arsenal. I have also started to do some patch panel replacement. I have found that sheet metal welding is tougher than they make it look on TV! my welds look terrible. But that is why I bought a grinder. I'm cutting my teeth on interior replacement that will likely be covered by floor mats and will be inconspicuous when complete. But I still shudder to think someone will see the gnarly welds and say "damn, does he even know how to weld?" Moving the ground clamp over to a magnet ground has helped. I guess current doesn't flow well through rusty seams throughout the cab.
Also managed to free the sticking brake drum that was keeping it from moving freely. The parking brake cable (set for replacement) was seized in the locked position and after some persuasion and cussing, I managed to release. Thankfully I was planning on replacing these components anyway. I keep thinking, I'm ready to sandblast and paint the frame any day now, but then I find something new to remove and it looks further and further away. Closer than before though.
Fenders have been sent off to a friend to work his magic and hopefully will be salvageable. As far as sheet metal replacement on the cab, I just need one good day (or night) to finish up and I think I'll be ready to start laying down some epoxy on it. Then move on to the body filler and prep for (eek!) paint!
I have set my timeline to be road-ready by my 40th birthday, which will be May 2, 2019. Should be able to meet that goal. Albeit, I am hip-pocketing the restoration and funds will be a large driver of that timeline. Add to that, I'm trying to do it all by myself, so time also becomes and issue. But its still cheaper than therapy. Loving every minute!
Wednesday, February 21, 2018
Diving in head first
Well, today I did it. I had some time to kill while waiting on someone to show up and pick up some seed, and I started in on my bodywork. I took one fender just to see how difficult it would be to remove the original paint from the parts. Hooked up the random orbit sander and some 80 grit (36 would be faster, but didn't have any in 6" PSA. I started in on it.
My plan was to just do a little piece. Then I did a little more. Then some more. Before I knew it, the entire outside was clear of 68 year old paint, plus a few repaints over time. So to keep it from rusting and to highlight all of the dents, I put a thin coat of rattle can paint over the newly bare metal. Boy there are lots of dents and dings that pop out when you get that gloss paint on it.
Did not take nearly as long as I anticipated to get it sanded, so I started on the other fender. Before I knew it, boom, it was bare too. Repeated the rattle can on it. Now I have two stripped and dent laden fenders ready to go to work on with the hammer and dolly.
Jump forward to today. Cold and rainy, not much going to happen, so out come the body hammers and I did a little metal bumping. I didn't take any pics or video of this process. there will be plenty of it and I can get video of it. But for my first time at bumping, it turned out pretty good. the little dents hammered out easy and almost invisible. Some of the other damaged places are going to take a lot more work.
Each have damage around the headlight bucket. One is pretty significant. There is also a rusted out area to cut and patch on the back, and a football shaped dent right in the bend. I wish all the bad was on one fender, but each have their own trouble spots and that will make for a challenge. I am hoping to use the original metal. If it becomes evident that they cannot be repaired, I will opt for original fenders over reproductions. Thicker metal, better made. Even if they come with some issues.
I need to move about 5 stacks of seed pallets and I'll move the doors and the hood in to start. Once all the seed is delivered, my remaining stock will get covered and the cab will come inside. That's when the real work will start. That one will take a good deal of patching inside, outside, cowl, lower corners, floor, drip edge, etc, etc, etc. Plus lots and lots of minor and major dents.
But based on what it took to strip and knock out the fenders, the job is feeling a little less impossible. Maybe just slightly impossible now. Some would likely say, scrap and do new. But I have plenty of time. Time isn't money on this job. Time is time, and likely will save money.
Tuesday, February 6, 2018
Rear end re-gear
Well, after having the third member from the rear end sitting around for about 5 years, tripping over it, moving it from here to there, it is officially no longer a trip hazard. The pumpkin is in the truck!
After removing the original 5.16 gear ratio rear end, I cleaned up the housing, replaced the seal, and popped the new pumpkin in place. Now this truck will motor along with a 4.10 gear ratio. Slightly better than the previous, which would wind the rpm's on that little 216 up higher than I ever want to run it down the road and top out about 40 with a favorable tail wind and downhill grade. I hope to achieve a reasonable highway speed of about 55 now. This truck isn't a racecar, so 70 won't happen, but at least I won't get blown off the highway.
I was pleased with how everything came out. All the components were in good order, so new seals and gaskets, a thorough cleaning, and reassembly. On to the next step!
Next order of business is to focus on frame completion. I still need to remove the shocks and work on rebuilding them. And final component stripping and welding up a few holes in the bumper before I take it to get sandblasted. That will come after corn seed is delivered and planted, so likely late March. Blast, epoxy prime, and chassis black. Then I will start to reassemble the entire frame and drop the drivetrain in. Something else I won't have to trip over anymore.
Then on to the last big restoration piece....bodywork on the cab. Have to replace some sheet metal, patch some little holes, knock out some dents. And oooh boy does it have the dents. Years of farm work will do that to one. Once the cab is straight, It will get stripped and a coat of epoxy. I imagine that while I am set up to strip paint and do body work I will go ahead and work on the rest of the body parts like the hood, doors, fenders, etc. and get them in epoxy. That should consume most of the summer.
I would love to have it painted and ready to re-assemble by the fall, but that will be a game-time decision for sure. Whatever I do it has to be capable of being vacated by Jan 1 when my seed comes in and takes over my shop. But its a project that isn't on a time table. So if it takes another 6 months, a year, or two, so be it.
A lot of the components were redone as they were removed and boxed away. Only thing is that many of those parts have been in a box since then (8ish years ago). So who knows what they will look like. I'm also going to be updating my gauge cluster with modern gauges. Except the old faces will be put on the new gauges to give the appearance of original.
If I had unlimited time and unlimited budget, like the TV shows, this thing should be done and on the road by next weekend. But since that isn't the case, and it gets worked on and paid for out of my hip pocket and lunch money, well, it takes longer. The last, and likely most expensive part will be the final piece when she is ready to roll, 6 new tires! I've been quoted $1800 for the set. So she may roll around on old rubber for a while. Someone let me help you buy a big ranch and we can speed this dude along!
Tuesday, January 23, 2018
Wow! Almost a year since my last post!
Decided to post an update while I'm waiting to receive some paperwork. Opened it up and was shocked. 8 days away from 1 year since the last post. Of course, nothing really new to report.
I've tinkered around some with my truck. Worked on getting the frame mostly stripped and ready for the sandblaster. Today I actually pulled the rear differential cover to let the gear oil drain out before I pop the third member out. I was pleasantly surprised with the condition of the fluid. Smelled nasty, gear oil always does, but wasn't burnt or milky. So no signs of issues with the current third member. Really doesn't matter as I'm replacing it with a higher gear ratio, and the condition of that third member remains to be seen. Visually it is fine. But what will happen when it gets in the truck I don't know.
Drew up a rough plan and material list for my bed. That one will be the last piece of the puzzle. I did however pick up two boxes of wood screws at home depot on clearance. I guess they are changing companies. The box of screws would have been $30/box regularly. Bought two boxes for less than the original price of 1. I think I may need to go back and pick up a couple more. Ugly mustard color, but the bed will get painted so it won't matter. They are torx head, which isn't exactly something that would have been around in '49, but I love working with them in wood projects.
Have my sandblaster lined up. He is a client who I helped sell his mothers house. They do a lot of tractor restoration and have a good setup. It will cost me a little in sand, but that is it. Only catch will be waiting until he has a free day where he isn't in the field planting or managing a crop, that is also a pretty dry day, and I can hit the frame with epoxy immediately so no new rust forms.
Well that is all for now. Guess it's time to get back to the grind.
Tuesday, January 31, 2017
Slow go....
Well, not sure anyone is following this anymore, if anyone ever was. Working on the truck has been stalled since the last update. A change in careers, building two businesses, and raising two kiddos has kept me from working on my truck. One challenge has been that one business is a corn seed agency that requires the use of my enclosed shop, and subsequently my workspace, for about 5 months out of the year. So all projects get evicted around new years, and can usually come back in around June 1. Problem with that is there are usually 2-3 projects that get bumped ahead, so truck is definitely on the back burner.
I have acquired a few items that I will need along the way so I'm not completely stalled. I managed to find a very straight grill from a restorer who was moving away from ADs and going to different models. Paid more than I wanted to, but it was straight. So I bit the bullet and paid the money. I also ran across a deal on some 2x10 lumber that I plan to use for the flatbed. ACP treated Southern Yellow Pine. I think by the time that I get to the step of building the bed, the lumber will be well dried and easy to work. It will at least have been through enough weather changes to demonstrate any issues that it may have. I also managed a few 2x6s and some 5/4 decking boards, although I'm not sure they will work as they may be a bit short, but would work for across the back. This assumes it doesn't get poached for my kiddos treehouse they have been wanting. I still want to build it with white oak, but finding a supplier has been difficult. Only oak I can find is cabinet grade, and I'm not going that route.
One other project that has been on the to do list for about 5 years is moving my big air compressor to the shop, and plumbing the inside and outside of the shop for compressed air. I finally wrapped that one up and crossed it off the list. So having a high capacity air compressor and adequate air lines will make the disassembly, rebuild, and reassembly much easier.
So looking forward, I'm going to focus on the frame this spring while the shop is otherwise occupied. I plan to work on getting the frame together. First will be to swap out the rear end with a 4.10 unit I acquired a while back. New seals on the axles and it will be ready to run down the road at a little more desirable clip. Then disassemble the few remaining items that need to come off, such as brake lines, bushings, and a few other loose pieces. Then get the rust off and everything cleaned up. Shoot it with 2 coats epoxy primer, and 2 coats of black chassis paint. New rubber bushings everywhere and get it back together. Then I can drop the engine and transmission back in. Free up some floor space and get a little closer to the finish line.
Well that is all for now. Time to get back to work making the money to keep the lights on and a little extra to spend on projects. Still cheaper than therapy!
Wednesday, April 16, 2014
No turning back now...
Well, it finally happened. I got the nerve to start bodywork. I will start by saying my previous body work experience has been packing bondo into dents and holes, then painting. Did a decent job, and a couple that were pretty crappy. So here I am going to put a pro job on this one.
Well, gotta start somewhere. Learn as you go. And realize when you are too far in, and seek professional help. Notice I didn't say, "realize when you are too far in, back out" or "seek professional help". I just think it's important to acknowledge when you are too far in. Whether you change course or not just depends on the situation.
I honestly think if I had an unlimited well of money, I'd still do it this way. It's just my nature. I want to say "I did it", not "I bought it". Will it take longer, yes. But that's ok.
So then I whipped out the flap wheel on the angle grinder and started to expose the areas where the spot welds were holding the cowl panel on. Then pulled out the drill and spot weld drill. And of course, you are going to need a grinder with a cutoff wheel. Hammer, center punch, chisel, and a sailors' vocabulary.

I'll just say that this is the second cowl that I have personally removed. in 1948, they used a whole lot more spot welds than in 1949. That being said, they still used a lot of spot welds in 49. And it isn't always evident where the spot weld actually is. So there were several extra spots drilled out that will have to be welded shut. Part of it.
Now there is one trick to removing the cowl. There is a seam across the exposed portion of the panel where the side cowl panel and the top cowl panel join. The seam is not noticible but is there and is covered with lead solder. Lead was the bondo of the time. So the blue tip wrench with a rosebud was necessary to sweat it out of there, exposing spot welds underneath.
Sweating out the lead video
Once all the spot welds were removed, and the corner welding points were ground, the panel can come off. Theoretically. Well, there is always just one little spot weld that holds on, that you have to hunt for and drill more holes than necessary. But I found it. Finally. Then the cowl was off. And with that exposed the inner support arm, a very large mud dauber nest, and a rats nest. And more rust. I already knew that the inside brace was rotten when I removed the fenders. Its just one of those places that gets constantly bombarded by the forces of nature. Right behind the wheel, mud packs up in there, gets wet, and stays wet. So I had already braced for replacement. And, as a bonus, the patch panel off my parts truck came with the brace pre-attached. So now I just have to cut out the old, and weld in the new along with the new interior footwell panel. The less welding and patching that I have to do, the better off we will be in the long run.

So that was the start to what will most likely be a 6 month project of getting the bodywork done. I will add that I was offered a sandblasting machine to use for frame and cab derusting. Definitely going to take up that offer. Till next time...
Well, gotta start somewhere. Learn as you go. And realize when you are too far in, and seek professional help. Notice I didn't say, "realize when you are too far in, back out" or "seek professional help". I just think it's important to acknowledge when you are too far in. Whether you change course or not just depends on the situation.
I honestly think if I had an unlimited well of money, I'd still do it this way. It's just my nature. I want to say "I did it", not "I bought it". Will it take longer, yes. But that's ok.
So then I whipped out the flap wheel on the angle grinder and started to expose the areas where the spot welds were holding the cowl panel on. Then pulled out the drill and spot weld drill. And of course, you are going to need a grinder with a cutoff wheel. Hammer, center punch, chisel, and a sailors' vocabulary.
I'll just say that this is the second cowl that I have personally removed. in 1948, they used a whole lot more spot welds than in 1949. That being said, they still used a lot of spot welds in 49. And it isn't always evident where the spot weld actually is. So there were several extra spots drilled out that will have to be welded shut. Part of it.
Now there is one trick to removing the cowl. There is a seam across the exposed portion of the panel where the side cowl panel and the top cowl panel join. The seam is not noticible but is there and is covered with lead solder. Lead was the bondo of the time. So the blue tip wrench with a rosebud was necessary to sweat it out of there, exposing spot welds underneath.
Sweating out the lead video
Once all the spot welds were removed, and the corner welding points were ground, the panel can come off. Theoretically. Well, there is always just one little spot weld that holds on, that you have to hunt for and drill more holes than necessary. But I found it. Finally. Then the cowl was off. And with that exposed the inner support arm, a very large mud dauber nest, and a rats nest. And more rust. I already knew that the inside brace was rotten when I removed the fenders. Its just one of those places that gets constantly bombarded by the forces of nature. Right behind the wheel, mud packs up in there, gets wet, and stays wet. So I had already braced for replacement. And, as a bonus, the patch panel off my parts truck came with the brace pre-attached. So now I just have to cut out the old, and weld in the new along with the new interior footwell panel. The less welding and patching that I have to do, the better off we will be in the long run.
So that was the start to what will most likely be a 6 month project of getting the bodywork done. I will add that I was offered a sandblasting machine to use for frame and cab derusting. Definitely going to take up that offer. Till next time...
Monday, April 14, 2014
Seperation of Cab and Frame
Progress is being made. The cab is completely stripped of components and this weekend I got the cab lifted off of the frame and onto the cab dolly. This was done with the help of a good buddy who dropped by. We discovered three things - We aren't as stout as we used to be. It's not super heavy but awkward, and I'm going to need to recruit more help to set it back on following paint. Sure would be a shame to get it all repaired and shiny and put a scratch on it while putting it back on the frame.
Once the cab was freed and on the dolly, I can now roll it around in the shop to work on it. Since it will be a while before I get to the frame, I went ahead and pulled it around to the back of the shop.
The frame will need to have the rear end third member swapped out to gain my 4.10 gears. Then just a little replacement of seals on the tie rod ends and spring/shock bushings. Then I will spend some time with a power washer and wire cup on the grinder getting all the gunk and rust off the frame. When it is clean, I'll lay a couple coats of epoxy primer on the frame and then a couple of coats of chassis paint.
In the meantime, I am going to get a few items prepared for sandblasting and powdercoating such as the wheels and the running boards. Hopefully the powdercoat will be a more durable coating for the parts that will get more abuse than some of the other components. Never had 3 piece rims powdercoated before. My hope is that I can get the wheels powdered up, then mounted up, and never have to dismount them. Tires will be the most expensive expenditure for the truck. A very good reason why I would never own a dually as a daily driver. Those two extra tires are just that much more expensive.
My next step will be to start replacing rusted panels and popping out big dents. Then paint removal by sanding and sandblasting in areas where I cannot fully sand or there is rust beginning to form (more than just surface rust) then two coats of SPI epoxy. Then the filler to get it all slicked up and ready for paint. This will likely take a long time working on it for an hour or two at a lick. Fortunately I'm not on a deadline so I can take my time. It is supposed to be a hobby. If I go too fast, then I'll be down one project and feel inclined to find another one.
Here is a picture of the cab on the dolly ready for bodywork:
Wednesday, April 2, 2014
Strippin'
So I am getting back to work on restoring the truck. Seems like life keeps sending me down detours that take longer than planned. But now I'm back for a little while. Read something funny the other day about picking a body shop to do your restoration. It said to look in the shop and see how many vehicles are sitting around being used for storage. Then I walked in my shop and noticed parts of three different projects resting on the rear of the truck frame. So I decided that it was time to get back to work. At least until the next detour.
So I started by preparing to remove the cab. The cab is the largest bodywork issue that I have, and will likely take the lions share of time on bodywork. And its the only part still resting on the frame. I knew in order to get it ready to pull from the frame, it needed to be stripped of all parts from the interior as well as the firewall.
My initial goal was to pull the passenger side door to gain easier access to the interior of the cab. I was prepared to call it a win. Well, it snowballed from there. I started picking all the stuff off the passengers side of the cab. Glove door box, glove door latch, glove door hinges, glove box retaining ring. Bagged, tagged, and in a box. Then the speaker grill and radio delete plate. Same story - bagged, tagged, and in a box. Then I pulled the seats and the gas tank filler nozzle. So one half of the interior of the truck is stripped.
Well, I still have a little more time and energy left. So moving on to the drivers side. Just get the door off, then I can roll on the rest another day. Door came right off, pulled out the hinges as I did on the passenger side for a solid rebuild. Then for the challenge. Gauges.
Now anyone who has spent any time at all around the Advance Design Chevrolet trucks knows that Chevy put these trucks together to stay together! I'm certain that the worst job on the assembly line was hanging those gauge clusters in the dash. It at least wasn't a position held by a sausage fingered german like myself. At any rate, three different 3/8" tools and quite a lot of contorting are required to remove them. Coming out is always easier though, because I knew I could cut the harness, didn't have to worry about scratching the paint on the dash, or whatever else I will face when re-assembly begins.
And as always, didn't take any before, during, or after pictures. After, not much to see. just a shell of a cab, empty. The only things that remain are the interior dome light, and the door seal trim on each side. There is one lonely screw per side that is holding them in. Only because I can't get them to budge. I did learn that anything from about 12" down on the truck is definitely going to be more stuck than anything above that.
I've went back and forth, and will probably go round again, but today the cab is going to get sandblasted. Tomorrow I may buy a blaster and do it myself. Who knows. But for now, There are two pieces of door trim, an interior dome light, steering wheel and column to remove. Then drain the gas and remove the tank, then 4 bolts holding the cab to the frame and recruit some muscle to help me lift it off the frame and onto the dolly (or trailer).
May be able to get that accomplished this week in the evenings before bed. Then possibly this weekend with a case of beer I can get the cab lifted off. Then start power washing, wire brushing and ospho'ing the frame getting prepped for paint. Then I can start putting the drivetrain back in and make a true roller out of it.
Well my lunch break is over. Back to it. Till next time.
Wednesday, December 18, 2013
Truck Therapy
Well, with the holidays, traveling for work, and other responsibilities, I haven't had a great deal of time to spend working on the old truck. But I am looking forward to a few days off around the holidays where I can pull the truck into the shop and start working on it.
I've made a few lists of things to do, things to buy, parts to replace, etc. Planning to move the parts cab around back, and pull the truck into the shop. Not quite ready for this step, but the weatherman is predicting us to get another 1" to 1.5" of rain this weekend, so I need to quit wishin' and get to pushin'.
That is really about all on that. Besides looking at every parking lot that I go into for a maroon that I like. Seems that no one can find a code to mix Cape Maroon, so I need a more modern color that I can pass off as cape maroon (a factory color in 1949) and a shade of maroon that fits my ideal of "maroon". Apparently there are a lot of varied opinions out there.
Monday, December 2, 2013
Back to it
Well, since it appears that I am on the 6-18 months between posts interval, I'm going to try and get caught up. So since the last post, I have cleared out several pending projects that were taking up workspace in the shop. Had a 1st birthday bash for my little boy Henry in the shop, and recruited help to move the parts cab into the shop for removal of the patch panels and whatever things I could reuse somewhere else.
I had anticipated that the removal of the patch panels would take much longer than it actually did. Even doing it the right way and drilling out the spot welds and such to hopefully make a much cleaner re-installation onto the truck. So I now have three patch panels that I don't have to make or buy. I always prefer the original to anything that is sold as repop. Even at its best, its no replacement for the original.


.JPG)
.JPG)


.JPG)
So now I have a stripped and somewhat sad parts cab sitting at the edge of the shop just waiting for me to move it around back and ultimately after bodywork is done, to craigslist to hopefully move on and help someone else out. Now the project facing me is to get the truck pulled from around back of the shop to inside.
I have the following items on the short list of to do's once it gets back into the shop:
1) Pressure wash frame and cab, before rolling into the shop
2) remove doors, hinges, other exterior items from the cab
3) remove large items from inside the cab
4) cut out/remove areas that need to have steel replaced
5) replace cutout areas with either salvaged patch panels or reproductions
6) remove dents from cab with hammer and dolly
7) sand and remove old paint
8) epoxy all sheetmetal with SPI Epoxy primer.
9) start filling and blocking of body parts
10) prep for paint.
Phew, I'm tired already. I should also mention that I have also already brought in the hood and split it so that the center of the hood could be cleaned and epoxy applied to thwart any rust formation.
.JPG) Somewhere between #5 and #6, I'm going to pull the cab off the frame and work on just the body inside. After the cab is off, I will likely get the frame prepped for epoxy and chassis paint, then the addition of the engine, transmission, and 4.10 rear end. About the same time, rims will be prepped, primed, and painted.
Somewhere between #5 and #6, I'm going to pull the cab off the frame and work on just the body inside. After the cab is off, I will likely get the frame prepped for epoxy and chassis paint, then the addition of the engine, transmission, and 4.10 rear end. About the same time, rims will be prepped, primed, and painted.
So every good project should have a plan. And that's mine. At least for now. But for now, I need to recruit some help to move a poor sad and lonely looking parts cab around to the back, and drag in the truck that is due a resto. That's all for now!
I had anticipated that the removal of the patch panels would take much longer than it actually did. Even doing it the right way and drilling out the spot welds and such to hopefully make a much cleaner re-installation onto the truck. So I now have three patch panels that I don't have to make or buy. I always prefer the original to anything that is sold as repop. Even at its best, its no replacement for the original.


.JPG)
.JPG)


.JPG)
So now I have a stripped and somewhat sad parts cab sitting at the edge of the shop just waiting for me to move it around back and ultimately after bodywork is done, to craigslist to hopefully move on and help someone else out. Now the project facing me is to get the truck pulled from around back of the shop to inside.
I have the following items on the short list of to do's once it gets back into the shop:
1) Pressure wash frame and cab, before rolling into the shop
2) remove doors, hinges, other exterior items from the cab
3) remove large items from inside the cab
4) cut out/remove areas that need to have steel replaced
5) replace cutout areas with either salvaged patch panels or reproductions
6) remove dents from cab with hammer and dolly
7) sand and remove old paint
8) epoxy all sheetmetal with SPI Epoxy primer.
9) start filling and blocking of body parts
10) prep for paint.
Phew, I'm tired already. I should also mention that I have also already brought in the hood and split it so that the center of the hood could be cleaned and epoxy applied to thwart any rust formation.
.JPG)
So every good project should have a plan. And that's mine. At least for now. But for now, I need to recruit some help to move a poor sad and lonely looking parts cab around to the back, and drag in the truck that is due a resto. That's all for now!
Wednesday, March 27, 2013
Just a long and winding road
Well, I apologize to everyone who follows the blog, as you have likely stopped at this point. I'm still around, just not been blogging or working on the truck. Since the last entry, we've added a baby to our family and he has kept us busy in he best way. Emma's loving being a big sister and making the adjustment well.
At any rate, I'm getting geared up to get going on it again since stock show season is over, it's staying light later, and I'm getting a few more minutes of sleep each night. So look for more frequent and productive posts in the near future.
At any rate, I'm getting geared up to get going on it again since stock show season is over, it's staying light later, and I'm getting a few more minutes of sleep each night. So look for more frequent and productive posts in the near future.
Thursday, July 7, 2011
Whew, its been a while
Well, its been almost 2 months since my last post. And since then I sold the small stuff on eBay and took the rest to the scrapyard. KIDDING! We have been nose deep in moving and remodeling a house so no time for fun on the old truck. However, with the move and the new house came a, wait for it, wait for it, new shop! Thats right! After waiting for many years, patiently I may add, I now have a 40x30 smooth concrete floor shop, complete with roll up doors, lights, electricity, insulation, the works. Yeah I'm a little excited. It also has a 30x55 covered area to the back as well as a 15' side cover for my truck. Finally have a place to park my truck (daily driver) out of the weather. So now with that done, and almost all of our possessions for the house no longer residing in boxes across the shop/garage/living room, I will be adding some plywood to protect the insulation, organizing, and getting ready to get down to business!
Although I must add that there was a slight bit of work done in the process. Since I last posted, I was able to acquire a rear end that after some searching and wild goose chasing was able to locate. Since back when, tooling was expensive, especially foundry forms, stuff didn't change. Particularly housings. They just changed/improved/modified the guts. So, from 1946 until 1972, all Chevrolet 3/4t & 1 tons used the exact same housing. I know right, the days of "if it works, leave it alone" are over (no EPA back then!). So after some research, I found that the 3rd member is also the same, sans internals. But it is a drop in unit.
My truck came stock with a 5.14:1 rear end gear ratio. Great for pulling loads or a house off the foundation. Not good for driving over 40, especially with a 216 motor. Some 3/4 tons came with 4.56:1s, but....a select few of the last rear ends to use said housing were installed with a HO52 model 4.10:1! Even fewer were installed in 3/4 ton suburbans from 67-72 which sported a 3.90:1 rear. I figured that I had better actually hunt for something attainable. So...a 67-72 chevy 3/4 ton which came sporting a factory V8 and factory auto and a coil sprung rear was said to have possessed a factory 4.10:1 rear end. And I was pretty sure that I found the one that I need in the very town that I work in. He said he bought the truck, a 3/4 ton cheyenne super, with a big block v8 and auto. All original truck, sans title. Alas, another one gets parted. But yay for me. Got it home, cracked open the cover, can't tell much, started counting teeth on the ring - 41. lets hope for a 10 tooth pinion. Well, cannot see the pinion from the rear cover. Drop the pig on out, its coming out one way or the other. I mean worst case scenario, I missed the 4.10, but the alternative for that truck was a 4.56. Still faster than a 5.14! Dropping the pig did not gain any access to the pinion, but allowed for very close inspection of the ring gear. And, wait for it, right there among presumably a part number and date of manufacture, was, 10:41. Step back and process. Now sometimes it takes us Aggies a minute. The number of teeth on the ring gear divided by the number of teeth on the pinion gear give you the gear ratio. Flip those numbers and divide 41 by 10. Oh man! 4.10:1. I found my jewel. No freight, and fairly reasonably priced I might add.
So now the pig is out of the rear end, wrapped in oily rags, staged up with all the parts for the rebuild in the new shop. Getting started again is my major motivation to get the house buttoned up so that I can start on the shop (a promise I made to my dear loving wife who agreed to let me have the shop)
Wednesday, May 18, 2011
Engine is complete
The engine is clean, gaskets all reinstalled, new bolts in a few places where necessary, and a coat of shiny new paint. After significant scraping and scrubbing with putty knives, grill brushes, degreaser and diesel in a spray bottle, and a good de-oiling with brake cleaner, it was all ready for a paint job.
This morning, I had a chance to replace all the pans and covers, prime the engine components with a coat of hi-temp engine primer, then followed up with 2 coats of new ford gray engine paint, and a final top coat of chevrolet gray from the filling station (the accepted "correct" color for this engine). painted the pullys black, the manifolds hi-temp black, bellhousing and other parts, reinstalled the water neck/pump/alternator and before long, will get the engine off the stand and reinstall the flywheel/clutch/bellhousing, then the tranny, and will be ready to be replaced in the frame, once it is prepped and painted.
But for now, its together enough to move and not lose parts. So, its time for the big move to the big new shop! Later. I'll post pics of the engine and the new shop before too long.
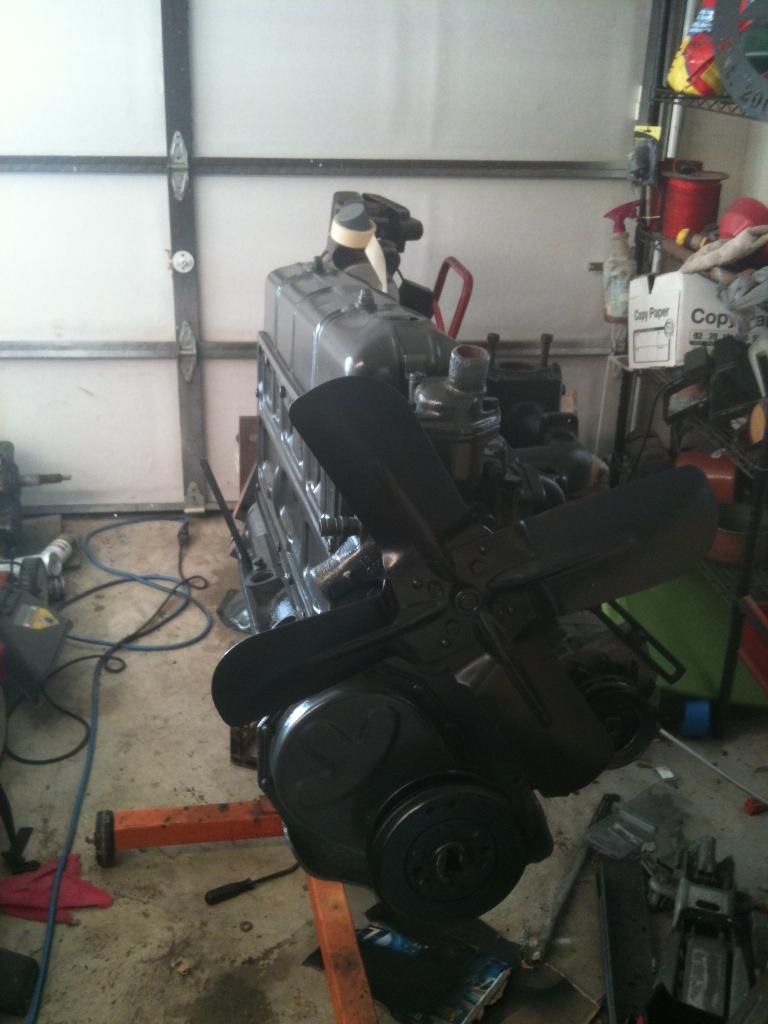
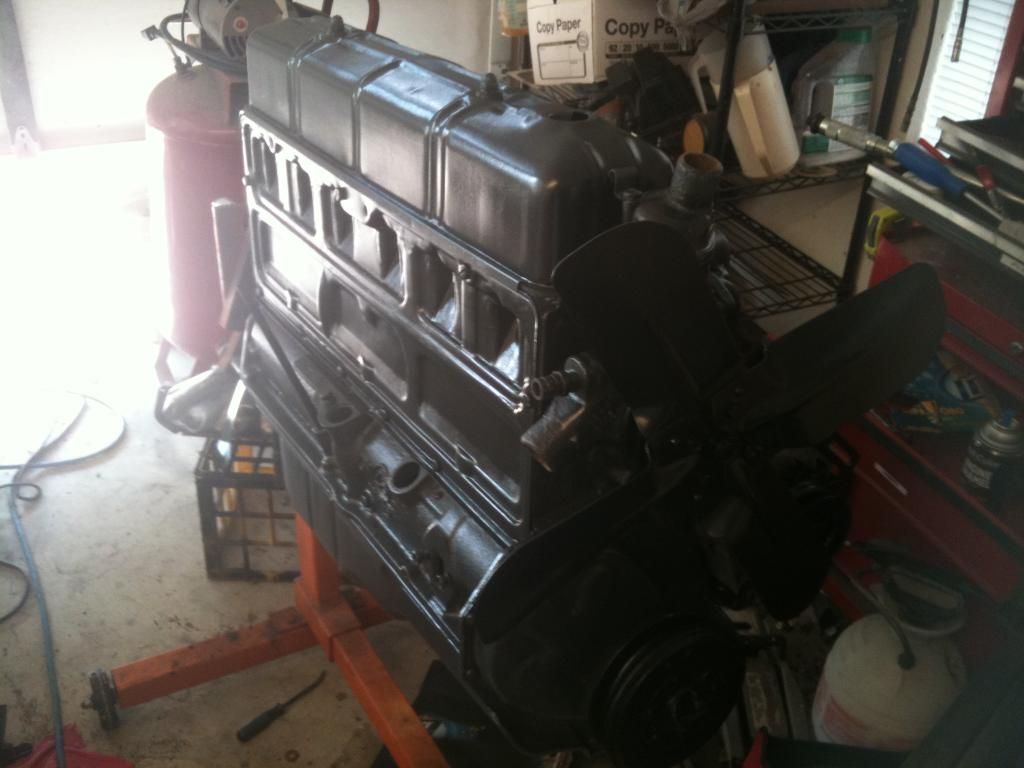
Friday, May 13, 2011
elbow grease to remove grease
Well, a few minutes a day have been devoted all week to cleaning the drivetrain. This ongoing procedure has been a piece at a time. The bellhousing has been the first component to receive a thorough cleaning, and is currently waiting for a paint job. With a few minor exceptions, the procedure has been the same for the other parts such as the engine block and the transmission, as well as flywheel shield, oil pan and the like.
1) Scrape old caked on oil/grease/dirt/gunk off with a scraper
2) Brush with wire brush
3) Apply and let soak overnight (or longer) with 50% Awesome degreaser and 50% diesel fuel
4) Brush/scrape and reapply awesome mixture
5) Scrub/rinse with soap and hot water (pressurized if possible)
6) Dry with compressed air
7) Address any leftover gunk
8) Spray entire surface with non-chlorinated brake cleaner
9) Mask, prime, and paint
Although there have been a few departures, such as hand scrubbing the oil pan to remove oil build up, hand scrubbing around the pushrods with a diesel soaked shop rag to remove accumulated oil gunk from the block, and utilizing just about anything possible to remove anything that is just hanging around waiting to break off and cause any problems.
I am hopeful that I will have an opportunity to go over the block once more with a scrub brush, then replace all the covers (oil pan, push rod cover, valve cover) with new gaskets, check for oil leaks (oil pan mainly), then give the engine several thorough scrubbing with hot soapy water, then a blast of air, brake cleaner, then paint, prime, and rock and roll. Why is all this being done in such a hurry? Because this motor is about to get moved! We are set to close on the 27th of may, so I will have a new shop to work in. But, I have to get it put back together by then in order to get it moved.
Sunday, May 8, 2011
Engine cleaning continues
So after a laundry list of activities today, I finally had the opportunity to start working on the engine about 10pm tonight. Started out by first scrubbing the oil pickup screen free of debris and gunk. Next, I scrubbed the oil pan from the same gunk amassed in the pickup screen. Then I decided that I would go ahead and tackle the albatross that I have been avoiding since removing the engine from the truck....replacing the rear main seal. Not necessarily the seal itself, rather, the fact that I have to disrupt the main bearings to offer enough clearance to install the top seal.


Ironically, it had not leaked a drop. Then I started cleaning, and I upset it. However, upon further inspection, it became evident that the motor did not even have a rear main seal in it?!?!?! How was motor oil not pouring out of the rear end of this engine? At any rate, I had no pattern to follow, no previous spot. The service manual was of little help. At any rate, I finally got it installed, and everything went back together handsomely.
I'll just get to wait and see if it decides to leak. Methinks I'll wait until I get it reassembled, but before I set it back in the truck to make sure it does not leak. Other than that, its time for bed now. Happy Mothers' Day all. g'nite.
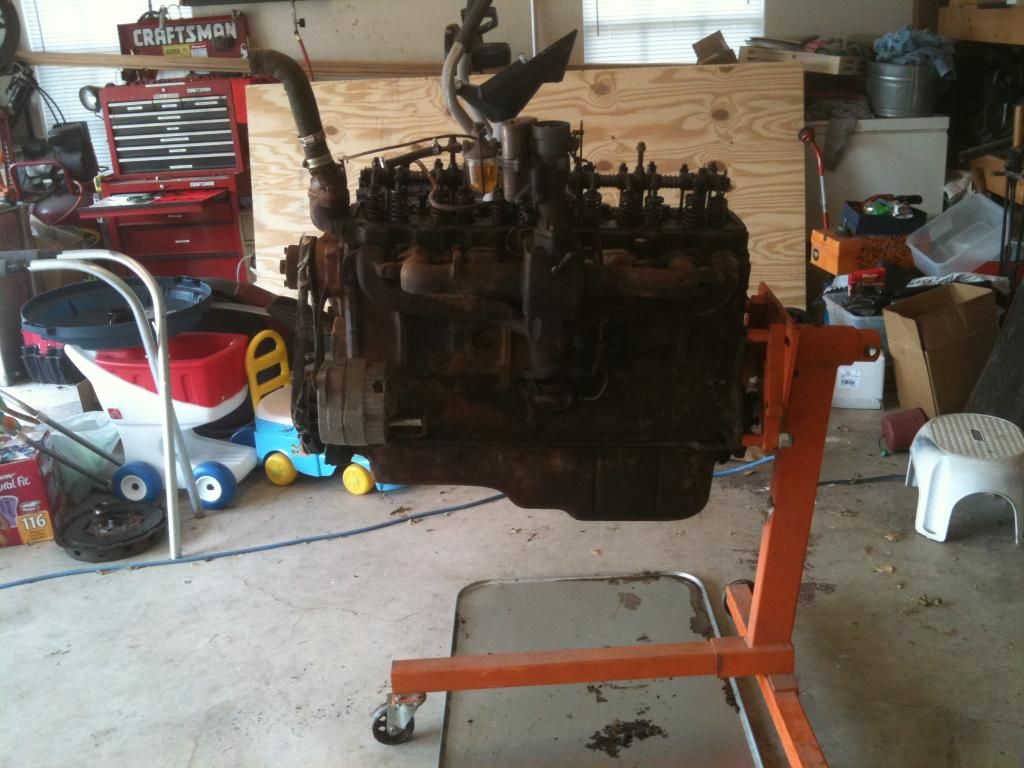
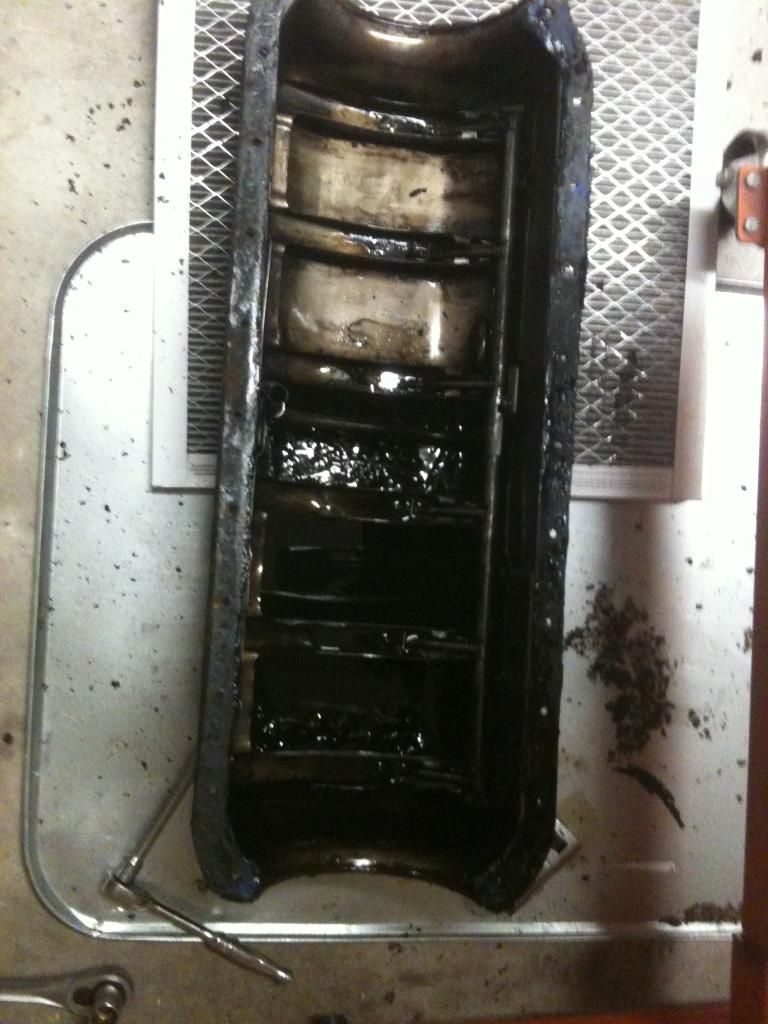
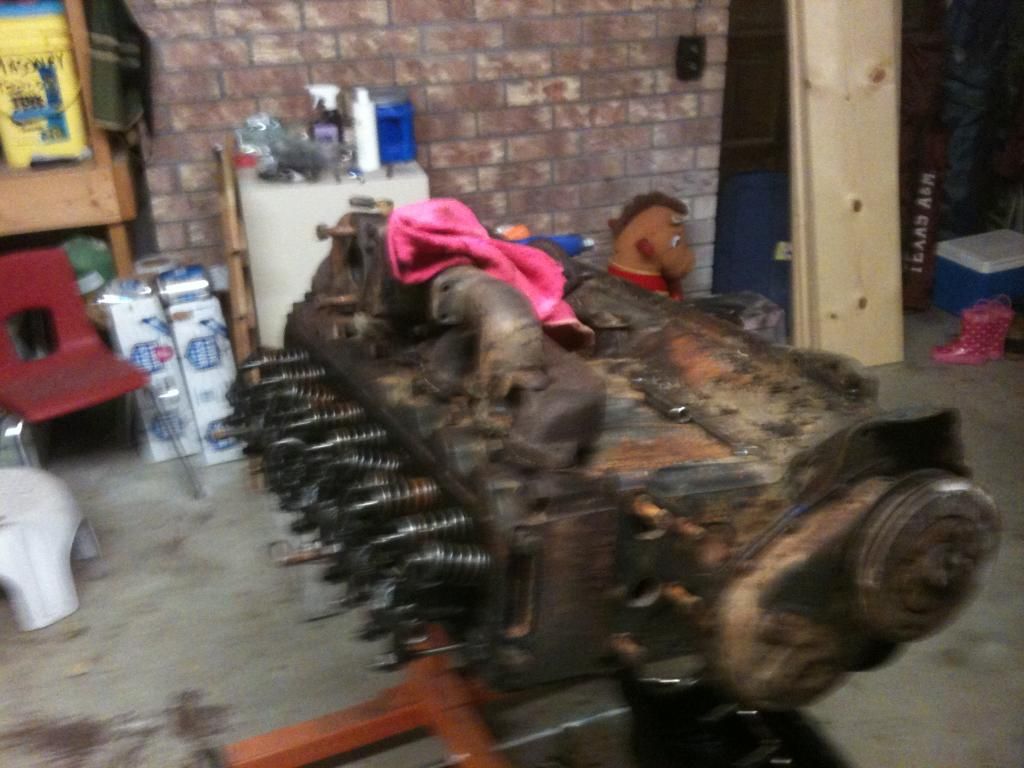
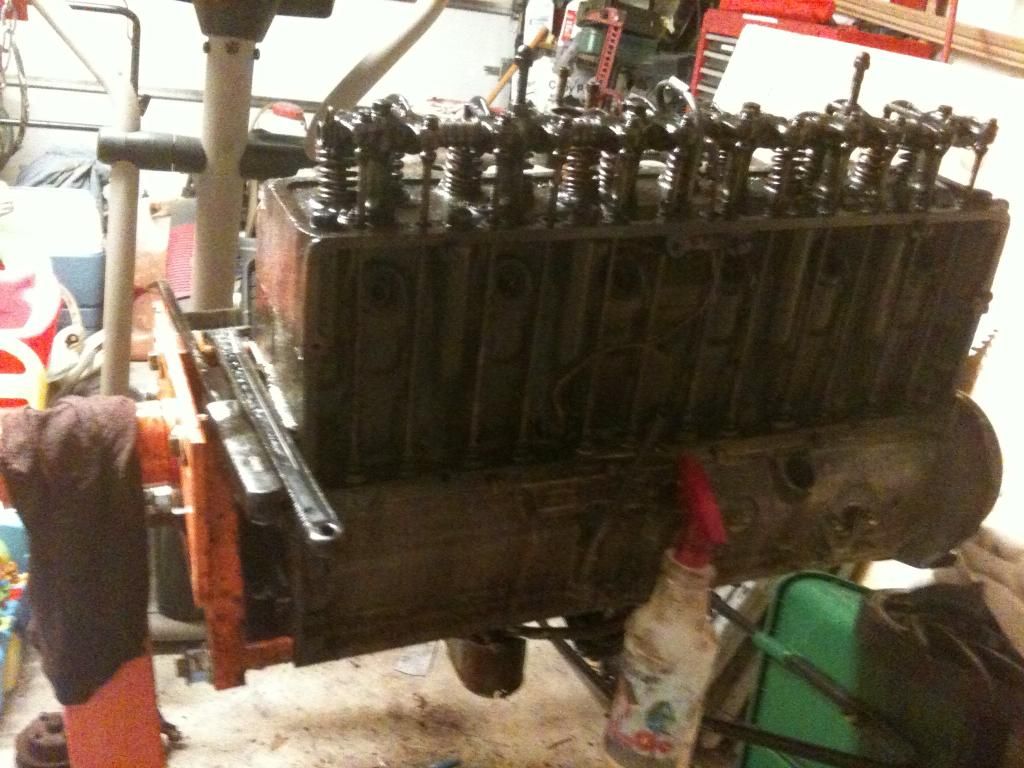
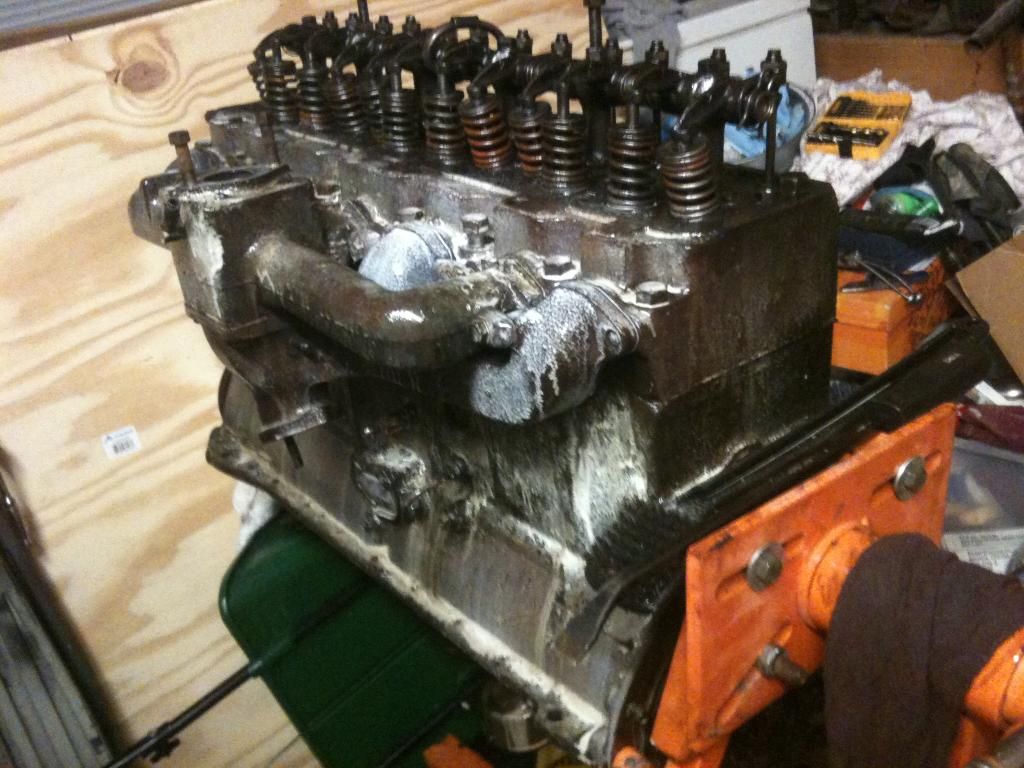
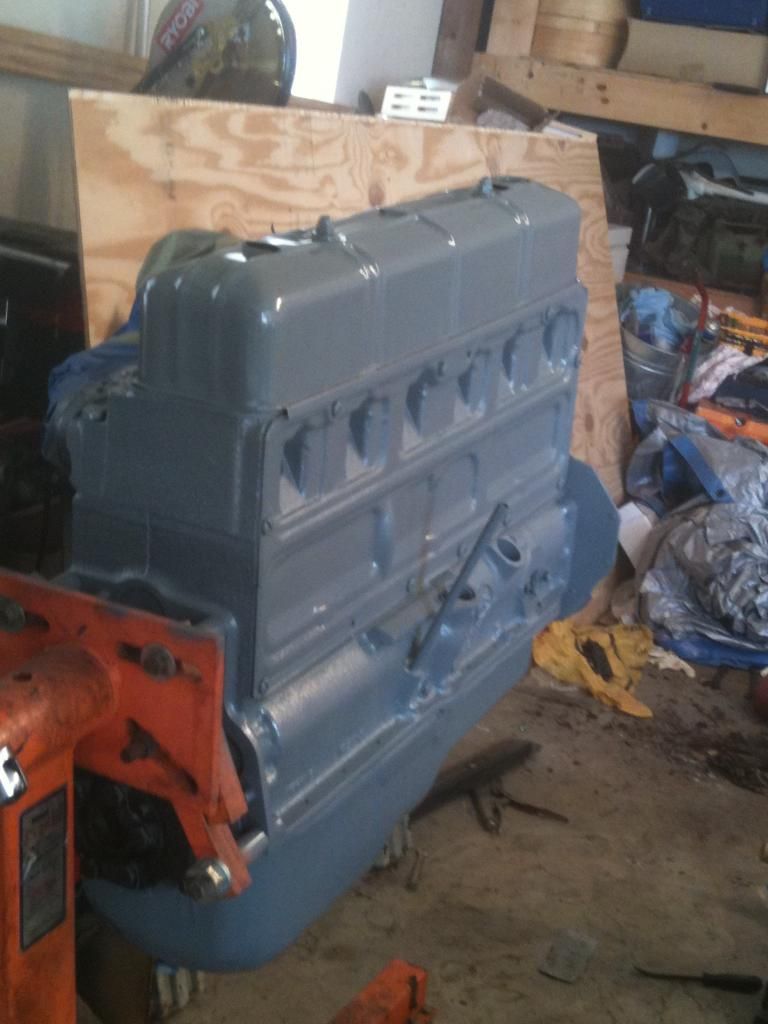
Saturday, April 30, 2011
quick update, can't stay long....
After a few nights of studying and tinkering and preparing, today marked the day that the engine was coming out. Last night, I ground the nut holding the rear motor mounts to the transmission crossmember, then disconnected almost everything that I could see would bind the motors removal. Determined that the remainder would be much better achieved in the light, so all work was postponed until after lunch. I had to work this morning, so after lunch was as fast as I could return to it.
So with a little carrot on a stick like a Freebirds burrito for my buddy Frank, I convinced him to help me pull the motor. Good thing. I needed an extra pair of hands. So long story short, engine is out and hanging on the hoist, soaking with degreaser and about to get a bath. So is the transmission. All that remains to remove now is the cab.

So....activities to look for in the coming days/weeks/months/years -
Cleaning, degunking, and painting of the engine/bellhousing/transmission
Removal of the cab
Replacement of the rear main seal
Cleaning/ospho/painting of the frame
Oh, did I mentioned that barring any unforseen uprisings, we will be moving by the end of the coming month? Oh yeah. So more on that later. Short story is, I will have my own, very large, accomodating, and beautiful workshop. Hehehehe. Best.Christmas.Ever!
So with a little carrot on a stick like a Freebirds burrito for my buddy Frank, I convinced him to help me pull the motor. Good thing. I needed an extra pair of hands. So long story short, engine is out and hanging on the hoist, soaking with degreaser and about to get a bath. So is the transmission. All that remains to remove now is the cab.
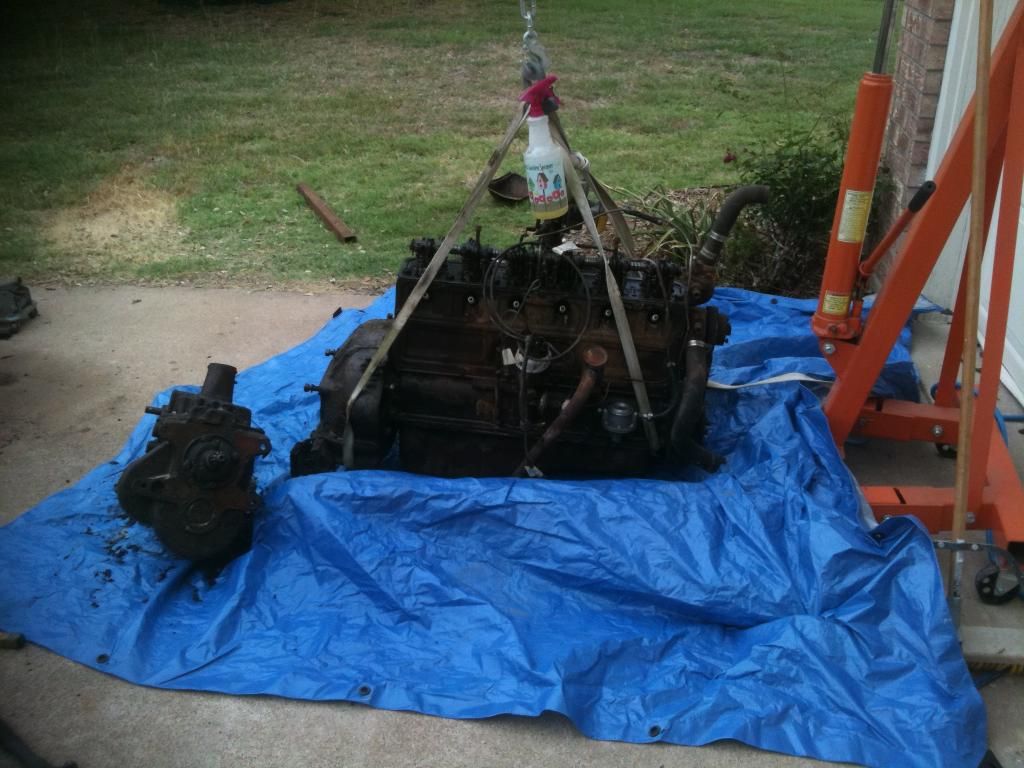
So....activities to look for in the coming days/weeks/months/years -
Cleaning, degunking, and painting of the engine/bellhousing/transmission
Removal of the cab
Replacement of the rear main seal
Cleaning/ospho/painting of the frame
Oh, did I mentioned that barring any unforseen uprisings, we will be moving by the end of the coming month? Oh yeah. So more on that later. Short story is, I will have my own, very large, accomodating, and beautiful workshop. Hehehehe. Best.Christmas.Ever!
Monday, April 25, 2011
An issue of "Motor-vation"
Well, following Friday's monumental feat of cab removal and just progress in general, I decided that I needed a followup performance. So after some family obligations, and a lengthy (and much needed) nap by my girls, I decided that it was time to haul the truck back from the farm to the house (concrete driveway) to pull the engine and get it spiffed up. So, hooked up the trailer, removed the outside duals on the truck, pulled it on the trailer, chained it down, and carried it home. Got home, unchained and returned to the driveway. It took my little girl all of 2 seconds to realize that her truck was back home. She let us know that with a resounding "My Truck is BACK!".
Started getting ready to pull the motor. Borrowed an engine hoist and stand, and started to label wires for removal. Also drained and flushed the radiator and block this morning. Now I am at a quandry. We received an offer on our house today, and I am unsure if I want to go ahead and pull the motor and get it cleaned and put back into the truck. Or sit on it until I figure out when (and if for sure) that we will be moving. I am hesitant primarily because the new house has a spectacular shop.
So...we shall see. Until then, I guess I can work on it a piece at a time. BTW, there are new pictures posted on the photobucket.
Friday, April 22, 2011
They call me Charile. Charlie Atlas.
Well Gentlemen,today my question was answered. How many men does it take to remove a cab from a frame? A question I had asked many and none would venture a guess. But they all agreed, not by ones' self. And most said not without mechanical lifting aids such as cherry pickers, block & tackle, A-frame, or gin poles.
So in final preparation to remove the donor cab, I needed to remove the pitman arm so that the steering box and mast could be removed so the cab could clear. I anticipated a battle royale simply to remove the pitman arm. The last one that I removed broke the pitman arm puller and required the entire steering box removed and the pitman arm cut off with a cutting wheel. This was on an 8 year old truck. 62 years old, and it slid right off. So following that and the removal of the steering box/mast, I was ready to call the manly forces and lift it up and off, with nothing but muscle and testosterone.
Now I wish that I could say that what happened next was the simple manifestation of Charlie Atlas, Arnold Schwarzenegger, Popeye, the Incredible Hulk, and Superman, but....well, I think it has more to do with Sir Issac Newton than Charlie Atlas. And a little touch of Bohemian ingenuity.
I started to lift and rock and shift the cab around to ensure that I had not missed any connecting points/wires, etc. Didn't want the help having to stand around drinking beers while I figured out what was keeping it tethered to the frame. Rock, tip, lift, push, shove. And before I knew it, the cab was half off. So, without the details (it all happened quickly and without incident) because frankly, not sure how it happened, the cab is now hanging out nicely beside the frame, on the ground, without tipping or damage. Smooth as silk. And to think, I almost bought the beer for the help. Now could you get one back on by yourself, no. Gravity usually only helps one way. But it did help the cab find its way off the frame and onto the ground.

Guess it is true, milk does do a body good!
Thursday, April 21, 2011
Latest work
Well, following a much needed and welcomed break from reality, I have returned. My lovely wife and I took a 7 day cruise and realized that we really love being treated like royalty, or at least what I would imagine. I went 26 years without making my bed on a regular basis, and on the ship it was made at least 4 times daily by our room steward, not to mention the towel animal and constant refill of the ice bucket.
Prior to leaving, a few minor items were finished up in a few spare minutes. The rear mount of the donor cab was completely removed. Also, I was finally able to figure out exactly how to pull the stick shift out. Thanks to the tremendous genius that resides at www.stovebolt.com, I was able to learn that there are two small lugs on either side of the transmission that, when turned 1/4 turn, they loosen a cap that covers the stick opening and with a little wiggling and holding your tounge and mouth just right, will slide right out. Steering box is loose as is the pitman arm nut. Will be returning soon with a pitman arm puller, and we should be ready to remove.
Called around and picked up a few quotes on getting the cab sandblasted, and it sounds like the two places that were interested in doing business needed to see the cab to make an accurate assessment, and the other one was "not interested". Oh well. I have learned that bbq guys, taxidermists, metal sign makers and sandblasters like to be paid in cash, and are willing to negotiate a little more if they know up front how payment is coming. So when I pull it off the frame, I'm putting it straight on the trailer and we are going to go ride around town and get a few quotes. Why sandblasting you ask? One, I want to start fresh, without worry of a tiny speck of rust hiding out. Two, because I don't want to find out after the fact that the paint chemistries disagreed and are locked in an epic battle. And three, it just makes for a nice, clean canvas to start work on. Furthermore, no one has volunteered a plastic container large enough for me to dip the cab into so that I could run electrolysis on it.
So for right now, it is waiting until the pitman is off, call the heavy artilliary, and see if we can get this cab lifted off. Beyond that, I have a cherry picker and an engine stand lined up, so I believe it won't be very long and the engine will be out and the engine will be the next component to be spitshined and polished.
Hopefully next weekend I'll get a chunk of time to work on things. I'm on the cusp. I just need to pull the trigger and line it up. My buddy Bradley wanted to sponsor the truck in the annual 4th of July Parade to advertise his business. I told him that he needed to define "sponsor" because the more funds that I had available, the faster the restoration would go. Apparently, he was talking about paying the entry fee and the fuel. Which at the rate we are going, may be a small fortune just in gas!
Also, on a related sidebar - I have decided that I want to drive faster than 40mph with the pedal to the floor, so I am on the hunt for a different gear ratio rear end than the 5.14:1 that is currently in the pumpkin. I understand that 3/4 ton 67-72 chevys with factory automatics have 4.10:1 rear ends that the entire third member bolts in. Please may I be so lucky. 60 w/o being at the very top end of the motor. Yes, Thank you.
More to come on that.
Sunday, April 3, 2011
Busy days, lots accomplished
Well, the past couple of days were very productive. Finally, progress. After a long and busy stock show season, I was able to take off on Friday without any major projects looming that had to be completed immediately. So I dedicated the day to the restoration.
First, I have determined that it will be in my best interest to swap cabs, as the original had way to many "love dents" to make the restoration the way that I want, and to keep the bondo at a minimum. So....work shifted to prepping the donor cab for the swap. I had the fortune of buying a '48 6400 almost for the price of hauling it away. I thought I had found the 1 ton that I was looking for, just north of Dallas.
Upon arrival, and further inspection, and some knowledge later, it turned out to be a big bolt (1-1/2 ton or larger) and decided to pass. Everything is just more expensive and much harder to find. Well, the guy had the truck parked at his dads, and he HOA was on his tail to get it GONE! When I started to walk away, he said what would it take to haul it away. I looked at it and said, it's worth $200 to me. His answer to that was, let me help you load it!
Consequently, it has turned out to be a great move. Sold the front fenders almost immediately for $75 each, and the front bumper and splash apron for another $75. So I am back in the money on it. Plus I still have lots of stuff to pick from it, not to mention the value simply as scrap.
Beyond that, I have robbed the seat bottom that is covered, a coil, distributor, and gauges to restore in advance of the restoration, and a fuel pump to test if mine was kaput.
Turns out that on my 49, the drivers door hinges were sprung at some point in its life (on almost every one!) and the drivers door was injured as well. However the 49 passenger door is in near perfect shape, except for one small dent. On the 48 donor, the drivers door was damaged, but the passengers door is perfect. So the doors were removed, and the great swap-a-roo will begin. Not to mention scavenging the parts from the doors that are useable in other areas, or easy to sell (and ship) on eBay! That problem solved.
Turning to the cab....donor cab - had clearance lights on the roof. I'm on the fence about adding them to the one ton, but will probably not because they were not there to begin with, even though modern 1 tons come with them. So 9 small screw holes to fix. One dent in the back of the cab, and easy to repair. In fact, those are the only issues that I have found of much consequence, well, except for a few extra holes from a mirror and what I presume were CB/radio antennas. With one exception, major rust damage to the floorboard. How they kept this cab as clean and straight as they did, yet let the floorboard rot to absolutely nothing is beyond me. At any rate, I'm gonna need a floorboard.
So after fighting with removing the doors, which was a chore, I turned to getting ready to pull the cab. Here comes the first issue. Had to remove the two front body mounts, which are 1/2" bolts between the floor and the frame. Rusted on, but removable. Done. Move to the back mount. Now I knew that somewhere in 48/49, they went from a 3 point mounting cab to a 4 point cab.
Well, my 48 cab is a 3 point, and the 49 is a 4 point. But I feel confident that all it will take to make it work will be a little R&R on the 49's cab mount shackles, and some reinforcing to the 48 cab mounting points. Issue two, that may be a larger concern, but not a deal breaker, is the fuel tank mounting. The 48 used an outside the framerail tank. In 49 they went to a behind the seat tank.
Well, lets just say there is extra stuff back there That impedes the installation of the tank. Some braces and extra stuff, but again, borrowing from the 49, and a little work with the cutoff wheel, should be in business.
So for removal of cab mounting point #3. So I grab a few wrenches and wiggle underneath the truck. Mind you, its out behind the barn in weeds. I crawl up and loosen two bolts. These are the ones that mount the cab mount to the frame crossmember. No luck, top of bolt is spinning above with no way to access to hold. Idea #2, a bolt that goes crossways which hold the bottom of the mount to the top, basically connecting the two pieces.
Well, it was quiet, and I started to hear some light humming. More of a buzzing. Mind you I'm under the truck and it is dark. I look up into a cavity in the mount and see the slight outline of something red and unhappy. Red Hornet. Now, I don't mind yellowjackets, but those red hornets are twice as big and much more grouchy. So from that it looked like it was over. Had to go pick up another wrench at the shop, and returned with a can of brake cleaner.
I figured after looking at the ingredient list - methanol, acetone, isopopanol - that it would burn the wings off those suckers. Insert straw, and press. Well, they were not immediately immobilized, only irritated and came out pissed. I remembered how fast this fat boy can get out of tight spots.
Eventually, they cleared out and I fought a few off and removed the last of the bolt. Bu alas, its stuck as well. So I have to figure out exactly how to remove that mount, or else at last resort, grind it off.
Spent a little more time working on removing wires and pedals and other items that would otherwise tether the cab to the frame and motor. All that I lack now is to pull the steering mast and figure out how to remove the stick shift so the cab will lift out easier without having to raise as high.
Took a break for lunch and returned to pick a few more parts that were in the way and take some more mental notes. I then turned to starting to get the 49 cab ready for the same removal. I removed the transmission cover (did I mention the 48 had a finely crafted custom cover fashioned from sheet metal and tin snips). I started the truck, let it run for a while, pulled it forward and moved it into a better position to continue to work on.
I am still at a loss for how to pull the cabs. I am leaning to borrowing or building an A-frame to hoist the cabs off, but I don't have concrete to roll it off, and at least one of the trucks doesn't exactly roll. I could bum a forklift or a skid steer, and while fast and easy, takes a lot of orchestration and requires calling in several favors. My third and least favored but most likely option involves plain and simple brute strength. A few guys, gloves, and a case of beer. Still on the drawing board on that one.
There were a few other smaller things that were done, but this gets the gist of it.
Wednesday, March 30, 2011
I love girls night!
Was awesome tonight. My wife and her friends have started doing a once a month "girls night out" so that means that I get a night all to myself once a month. So, after spraying around the shop and farmyard for weeds, and a few other necessary items, I got a little truck time in.
Ground down the welds on the back bumper of the truck so it just looks cleaner and more straight. Then ground off the bolts holding on the running boards. Both of those were adventures, because I have been very concerned about setting the grass on fire. But no fires were set, and all was good. I have decided that I will be swapping out cabs, because the one from my donor parts truck is just in much better shape. This should be exciting. I was going to pull one off so I could get the frame, motor, and tranny cleaned up and painted. So I guess I'll be pulling two cabs. Ah well, one cab, two cabs. Shouldn't be much extra work.
Following the evaluation of the doors on both cabs, one truck has a pristine drivers door, while the others is shot. Conversely, the door on the 3800 on the passengers side is in great shape, and the donor has a pretty big dent. So, I guess I couldn't have planned that any better. Further, this cab has no dents in the roof, back, or a sprung cowl panel on either side. Kind of ironic that a 2 ton truck had a nearly dentless body. Would have thought it would be worse off.
Drawbacks, a few extra holes in the dash, holes in the roof from clearance lights, and a completely rotted floorboard. But, I can fill the dash holes, and as for the floor....well, lets just say that my friend the floormat will go a long ways to help me out there.
So after the evaluation of the doors, I decided to attempt to take the drivers door off the donor. Lets just say, it is going to require a little more persuasion to get the bolts out. Following that I came home and cut a slit in the tailpipe to prepare to clamp down onto the muffler, and cleaned up and painted a new gas filler nozzle that is rusted out.
Hopefully, this weekend I will get a chance for some more stuff.
Wednesday, March 23, 2011
Big ole rear end
Well, seems like time just keeps getting tougher and tougher to leave me some time to work on this project. But little by little I keep plugging away. Not much has occurred labor wise on the truck since the last installment, but there have been some major developments in the way of motivation of the truck. Happened to stumble across yesterday on my favorite truck forum, www.stovebolt.com, that the rear end in my truck was used in 3/4 & 1 tons from 1946 all the way to 1972. Guess don't change what isn't broke. Well, apparently in 67-72, there were a few 3/4 tons factory equipped with V8's and automatics. These trucks featured something that is becoming highly sought after from many regards, but in my instance, old stovebolt trucks.
Apparently, chevy put three gear ratios inside those rear ends, a 5.14:1 (what mine currently has), 4.59:1, and with a 67-72 Factory V8& Auto, a 4.10:1. So since I plan to drive this truck down the highway, I am very interested in the 4.10. Will take a load off the engine as well.
At any rate, the GM HO72 rear end, as they are officially named, oddly enough, though individual components do not interchange across all 25 years of production, the third members do. So swapping out the gears will be a much simpler job. Best of all, I have two already spotted and just have to get right on the price!
In other somewhat less exciting news, I finished disassembling my grill and managed to roughly repair an area on the hood latch panel that was opened more than it was supposed to.
Soon, more will come.
Tuesday, February 22, 2011
Once a month posting
Well, I had to re-read the past few posts to see where I left off. Didn't realize it has been exactly one month since I updated my blog. With stock shows, preparing to (hopefully) sell our house and move to another one (with a large shop), and other responsibilities of life, there has not been much actual work performed. But to follow is what has been done sine the last post:
A little more tinkering with the dash gauges. I have accumulated 3 sets and will be keeping one and selling the other two on eBay. Perhaps finance the next step in the journey. They have been in boxes and I am ready for a night to just sit down and put them all back together.
My next step was a little time to cut off some extra metal off the rear end of the truck. Along the way, there were lots of heavy duty light holders and other "items" firmly attached to the rear using thick steel. A little work with a plasma cutter made short work of them. However, the tall grass and short moisture made for a little interesting cutting! Had to stay on firewatch the entire time. But after a few foot stompings, we completed the job. I'll be adding a piece of diamond plate to the top of the existing bumper to cover up some of the 18 some odd holes and give it a little more factory appearance.
Finally, I borrowed a pressure washer from a buddy and I degreased the motor and the frame. I plan to soak it once more with engine degreaser and repeat. Then the frame should be mostly ready for paint. Thats all for now.
Saturday, January 22, 2011
Whew
Wow, just realized it has been a LONG time since I posted an update. Well, here it goes...lots has occurred since the last post. Started to work on the meat and potatoes of the restoration. No more piddling around!
Grill Removal - Removed the painted grill from the front end. Had a few dents and issues, but nothing that can't be smoothed out. Ground all the rivets off and all the pieces are now apart - vertical supports, inner bars, outer bars. After that, took the badly dented bars, applied a little heat, and popped out the dents so there will be less gap to fill with bondo. More of a skimming process than a filling. Next step, paint and rust removal
Fender Removal - Moved the truck over to the farm. Twisted around on all the bolts and all the fenders are off. In fact, all the sheet metal from the front has been removed. Again, a few deep dents, particularly around the headlights were heated and popped out, requiring very little bondo again to get them straight. I am starting to feel like I am a little more confident in the body work aspect.
Underhood Sheet Metal - All this is in great shape. No dents, etc here. inner fenders, radiator shroud, hood latch, etc., will be cleaned and painted semi-gloss black. I am also considering having all the semi-gloss parts powdercoated, which would include the running boards.
So...for all of you who may be wondering how in the world to get these parts clean and paint free, I have an answer. And I have expanded my method to be very easy. On a previous project, I learned about a process of electrolysis, which uses water, 12v DC current, and a electrolyte to pull rust from the affected part to an electrode in the water. Effectively, all the rust leaves your part and adheres to a scrap piece of metal. After expanding upon this process, I learned that sodium hydroxide (lye) would also remove paint, oil, and grease. Well, we happened to have an old chest freezer at the farm, and it will be converted into an electrolysis bath that is large enough to dip an entire fender at once! So, save money at the sandblaster, don't worry about the panels coming back wavy, and having to find sand in a crevice while laying down a finish coat.
Bed Removal - So in an ongoing attempt to prep the truck for paint, the stake bed has been removed. I cut the u-bolts holding the bed on, and put sawhorses under it, and drove right out. I had always intended to simply repaint the bed and reinstall, keeping the patina of the old wood. However upon further inspection, and a few boards that are in rough shape, I am currently considering completely rebuilding the bed. Still not settled either way.
I also worked on painting up a set of new gauges, with new decals, needles, and freshened up paint. Those have been a bit more of an undertaking than initially determined. Still working on that project. Finally got the steering wheel pulled of the parts truck and will start filling the cracks on it.
Well, we've got a pile of work done, and a heap left to do. But, it all seems to be going right along. Hopefully next time I'll not wait so long before the next post.
Subscribe to:
Posts (Atom)

